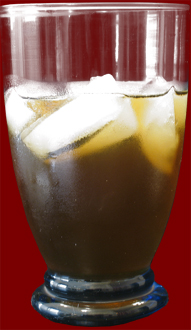
Photographing Real Glass for a Photoshop Layer
To photograph a real glass to be used in a photoshop layer just takes a little thinking.
First of all, you need to think black an white, Highlights and Shadows.
You set up your camera on a tripod because you will need two pictures to do this. Then you think of a way to change the background
without moving the possition of the glass. I carefully raised the glass, a little and pulled the black posterboard out, leaving the white
posterboard that I had under that. That way I didn't need to move the glass very much, and the posterboard did not bump the glass,
it just slides out from under the glass smoothly. Then I changed the back board.
The black needs to be as black as you can get, and the white needs to be as white as you can get. So, you will need good lighting
that does not change for both photos. I used black felt for the background in a bright lit room, and croped the bottom area of the glass,
because the poster board wasn't dark enough.
Once you have the two pictures, copy them and paste them both in in a new document, and align them.
What you want to do now is select all of the bright while with color selection in the picture with the white background. You don't want
to delete this, because you still need parts of this. just invert selection and copy, and paste in a new layer.
You do the same with the black.
When you hide the black and white background layers you will see everything is there, but the brightest highlights on the glass.
With my glass the white areas of the ice, and the highlights on the glass was missing. I don't know it might be different for you, and
you managed to get the whitest highlights from the black background, but if you didn't. The white is missing.
I only know of one way to fix that, and this you might want to remember, because it can be used in many ways for many different things.
You use the black layer, and select channels and while holding the Control button down, you select on of the Channels and copy what
is selected. and paste that in for the highlights. When you see what that can do you would think, Why don't I just do that for the whole
thing, but if you look at the difference you will see all of this together is much better. The hard way is the best way.
Once you have the glass by itself, without any backgrounds select all and copy merge, and then you can paste it in a new document as the final
layer.
Once you have that you can paste another copy on top for coloring. Then Select/Load Section... Or hold Control button and click on the layer
with the mouse. Then get the brush tool, and set the mode to Color, and color the glass. Then to you can fade the color with the layer
underneath, and copy merge to create a new layer with what you are happy with.
You will have every thing including fingerprints on the glass as a new colored layer to use anywhere you want.
Note: This way of making photo object can be used for anthing you find hard to make a layer including hair, and anything you can see through.
It is almost the only way, besides blue screening to you will ever find to do things that takes more than just croping. And it is the most
acurate way I know off.
I hope you learned a lot more from this, and your wisdom of working with photoshop has improved. I have worked with Photoshop since 1994
and when I want to do something I just put a little thought to it, and can come up with a way. Everytime I think of a way it
is different, but this one seems to be the best way I know of.
Extra Note: If you want to do this a lot, it would be a good idea to save the actions as an action file, so photoshop can repeat
these actions quickly. But, if you use actions that you didn't create, you will never learn how to create, and think for yourself.
For all of those that think they are great at creating actions, they totally miss that point. Their additude(I am better than you,
because you will never learn.) Experiance Photoshop for youreslf.
Here is a PSD of the glass I did with the camera and photoshop, and I added two that I drew. One is milky looking To take some of the
milky look out of the glass I held down on Ctrl and clicked the layer, and inverted the selection, then hit Delete, and that took
some of the light shaded pixals. Glass PSD Download